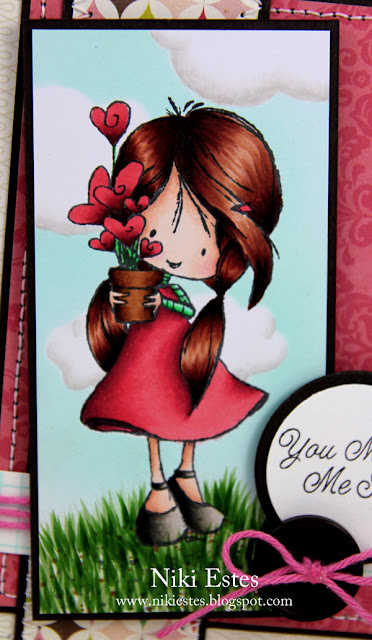
Today, I thought I would share a card I created last month and a little tutorial on how I shade the clouds behind my images. I recently picked up some Tiddly Inks images from an online shop and had to ink one up right away.
This adorable little girl is from the Friends are Flowers stamp set. I love the little heart flowers in the pot. The sentiment I used is from a little stamp that comes with one of the LOTV images.
I colored the image with copic markers (listed below). I added some grass under her feet before masking to spray the sky and clouds. I put together a little tutorial to show how I create the clouds.
Mini Cloud Tutorial
These are the supplies I use when spraying my backgrounds. I have the clouds die cut from some Tim Holtz masking plastic. It's nice because it's slightly tacky and you can use them over and over.
I stamped the image on some Eclipse masking tape and cut it out to create the mask for my image.
First, put the mask over the image. I didn't worry about masking the grass I had added because the blue is a light color and won't cover the darker green.
I added some of my cloud masks randomly around my image. Then, I sprayed the piece using a blue copic marker and my air compressor.
For this tutorial, I used W0 and W1 when coloring my clouds. (I didn't have W00 when I photographed this tutorial. I now use that color, too, since it is even lighter.) First, I went around the the clouds where I wanted the shadows with the W1 marker. Then, I flicked the color up using the W0 marker to help blend the colors up. I did this a couple times until I got a nice blend and shading to my clouds. Remember to use a light hand so the clouds don't get too dark. I often go over the gray again using my colorless blender, too, to lighten the colors. (This can push too much color to the bottom of the clouds, though, so use it lightly.)
I later added more grass below her feet, too. If you have any questions, please feel free to ask.
Thanks so much for stopping by! I love hearing from my blog readers! :)
Niki
you make me smile card supplies:
Stamps: Friends are Flowers (Tiddly Inks), sentiment (LOTV)
Cardstock: X-Press It (Copic), hot fudge (MFT)
Patterned Paper: This & That: Graceful (Echo Park)
Ink: Tuxedo Black Memento (Tsukineko)
Embellishments: twine, hot fudge button (MFT), pearls, graph washi tape
Copic Markers
skin: E000, E00, E11, R00, R20
hair: E13, E15, E17, E19, E18
dress: R32, R35, R37, R39
shoes: W2, W4, W6, W8, W10
shirt: G05, G00
heartsL R24, R27, R37, R89
pot: E33, E35, E37
sky: BG11, B000
grass: YG11, YG63, YG67< E35, N6, N8
clouds: W0, W1


9 comments:
This is awesome & very helpful! Thank you!
Totally gorgeous card as always and great tutorial!!
Hugs, Dena
Thanks for sharing.............love all your cards :)
Wonderful card! Your coloring is tops! THX for the cloud tutorial. :)
Really cute! And thanks for the tutorial. I never would have thought of doing clouds that way. It looks great.
Wow, your work is extraordinary! So glad I found you :-)
Super cute! Love the coloring and the tutorial, I never color in my clouds, so I think I will do this once and see how it works for me. Thanks.
Such a sweet card, that little girl is precious. Wonderful tutorial, thanks for taking the time to show us. Can't wait to hear if you have a boy or girl. Hope all goes well.
I am so far behind on your blog -- WOW! Firstly, those clouds are tremendous - thanks for sharing how you make them -- love! That little girl is just too cute, and as always your coloring is spectacular... did you take the certification course, or are you just naturally talented, and figured it all out on your own? I do ok - but NOTHING like this -- stunning. :)
Post a Comment